


Easter is the perfect time to enjoy creating a gorgeous DIY Easter table centrepiece. Using some popular Kmart items, it’s also very affordable! Whilst there are multiple steps to this craft project, if you’re patient you will be rewarded with a beautiful one-of-a-kind Easter ornament that you can showcase as part of your Easter décor for years to come.


To complete this craft project, you will need:
- 1 x Kmart Wooden Birdhouse
- 1 x Kmart Plywood Circle
- 1 x Kmart Set of 4 Pastel Satin Paints – or any paints of your choice
- 1 x Ceramic Cake Stand
- 1 x Piece of Oasis or Polystyrene Foam
- 2 x Purple Eucalyptus Bush – or any greenery or picks of your choice
- 1 x White Star Flower – or any flowers or picks
- Embellishments and decorations e.g., Birds Nest, Bow, Birds, Butterflies etc
Of course, you can source similar items from your existing craft supplies, your favourite craft store, or anywhere else that you might find them, but we love that we can get a lot of what we need for this project from Kmart!
The tools you will need are:
- Paint brush and paint roller
- Masking tape
- Scissors
- Wire Cutters
- Hot Glue Gun
Step 1
Choose the 2 colours that you are going to use to paint the roof. When thinking about which colours to use, I suggest opting for a lighter colour as the base colour, and then you can easily apply the darker colour over the top to create the stripes. I chose to use pink and blue with pink being the base colour.
Using the paint roller, give the roof of the birdhouse 2 coats of paint in your chosen base colour. Let the paint dry completely between each coat. I found it took about 1-2 hours to dry completely depending on the temperature of where it was drying.


Image sources: Kmart, Gifts & Keepsakes
Once the firsts 2 coats have dried, mask up the roof with masking tape or painter’s tape to create stripes. Make sure you fix the edges of the tape down very firmly so as to create clean lines and avoid any seepage.
Step 2
Using the roller, apply 2 coats of the other colour paint that you have chosen for the roof.


When the paint is completely dry, peel off the masking tape to reveal the lovely striped roof of your DIY Easter centrepiece.
Step 3
Now it’s time to paint the walls.
To protect your freshly painted roof, I suggest you apply painter’s tape around the edge of the birdhouse roof. I used a brush to paint the walls and the underside of the roof. Again, I applied 2 coats of paint, allowing each coat to completely dry in between.


Step 4
The final step in the painting process is to paint the base or floor of your birdhouse. Unless you have a very steady hand, I recommend you tape around the walls where they meet the base. Be sure to wait until the walls are completely dry before doing this so that you don’t damage your precious paint work!
After 2 coats around the base, peel off the tape and voila!
Whist you are painting the base of the birdhouse, I suggest you paint the plywood circle that the arrangement is going to sit on in the same colour. To create a coordinated look, I chose green for both the base of the birdhouse and plywood circle, however you can paint them whatever colours you desire.
Step 5
With all the painting out of the way, we now move onto creating the floral base that your pretty birdhouse is going to sit on. You will need a small piece of dry oasis or polystyrene foam. If you’re not familiar with oasis, it’s a foam created specifically for floral design. The oasis needs to be approximately 41cm x 10cm x 3cm. Secure the oasis in the middle of the (dry!) painted plywood circle with hot glue and apply pressure until the glue cools and it is secure. For a professional look, you could opt to cover the oasis with Spanish moss by using floral pins or spray adhesive. However, once you are done, the base will be completely covered in greenery and flowers, so you won’t see any of the oasis when the DIY Easter centrepiece is complete, hence this step is purely optional.


Step 6
To add the greenery and flowers, you need to work with picks or small stems of about 25-30cm. I cut down a couple of pieces of greenery and flowers to create smaller pieces of the right size. Start with your greenery and work your way around the base pushing the greenery pieces into the foam. You can secure each stem with hot glue if you like to make sure that they really stay in place. Or leaving them unglued gives you the option to easily change out the pieces another time.
Next, work in your flowers distributing them equally around the base and blending them into the greenery.
Step 7
Once you have your base covered in greenery, use hot glue to secure your pretty birdhouse onto the top of the oasis. You will need a generous amount of hot glue and to apply a good amount of pressure until the glue has set.


Step 8
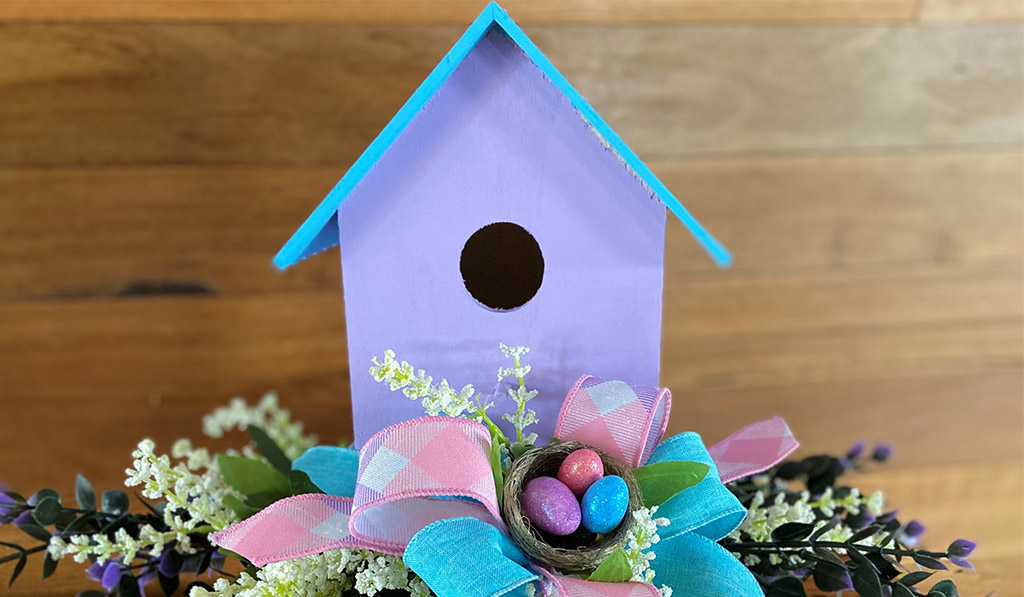
To finish off your pretty DIY Easter centrepiece, add some cute embellishments. I have chosen a gorgeous wired bow, a sweet little nest with glittered eggs and a pretty pastel bird. These can be secured in place with a little hot glue or simply wired in.
Step 9
The final step is to give your gorgeous DIY Easter centrepiece the elevated stage it deserves on your table. I used a white ceramic cake stand for my centrepiece which I just happened to get from Kmart.
Great work, you’ve made an eye-catching, unique Easter centrepiece to display in your home! Why not create more gorgeous DIY Easter décor pieces to flow throughout your home?
If you’d like to see how this birdhouse centrepiece was made, we uploaded a video to our Facebook page talking you through all the steps and products used. We hope you will give this gorgeous DIY Easter centrepiece a try and if you do, we would love to see your creations. Please share to your photos with us on Facebook, Instagram, or via email.
There’s so much more fun to be had! You can find more Easter craft projects on our blog, plus Gifts and Keepsakes online store is loaded with beautiful Easter décor and florals for your home and Easter DIY craft projects. You can also search for the perfect gifts for Easter, all in the one place.