


Crafting Easter décor, such as an Easter wreath, is the perfect creative outlet that not only you can enjoy, but so can your family and friends when visiting over Easter. This Easter craft activity is a great way to get extra use out of your Christmas wreath for the upcoming holiday season.
The period between Christmas and Easter often leaves us desperate to create extraordinary masterpieces, so we are going to show you how you can transform your Christmas wreath to create a beautiful Easter wreath.


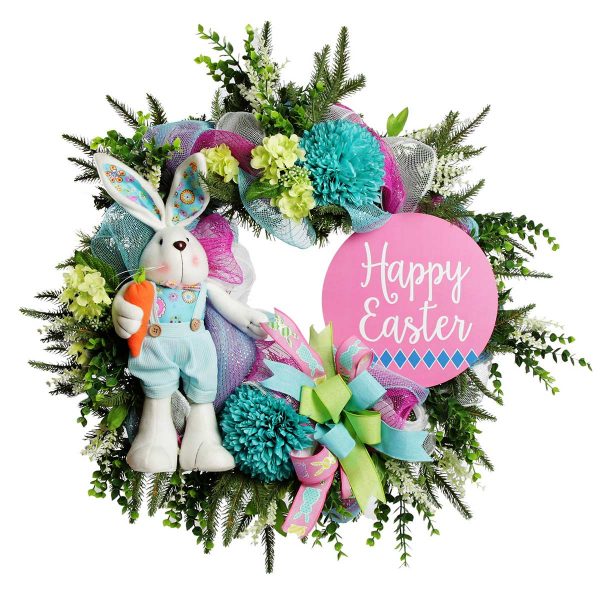
The main thing we love about Easter (other than the mountain of chocolate to be consumed – of course) is that there are lots of colours and styles to choose from when decorating your home. For this wreath, we have opted to use bright and fun colours and characters, but you can adapt to your own style by choosing materials to suit your colour palette.
Supplies to Make your Easter Wreath:
1 x Evergreen Wreath Base
1 x Feature Easter Bunny
3 x Deco Mesh Rolls
1 x White Flower Bunch
1 x Green Hydrangeas
1 x Greenery Bush
2 x Feature Flowers
1 x Easter Wreath Sign
1 x Pre-made Bow or Ribbons to make your own bow
Tools you will need:
Wire Cutters
Floral Wire/Pipe Cleaners
Scissors
Hot Glue (optional)
How to assemble your DIY Easter Wreath:
1. Fluff your Easter wreath base
You can use any evergreen wreath you have. We have used the Lush Full Evergreen Mixed Pine Wreath, which you will find on our sister company, The Christmas Cart’s, website.
If necessary, you should start by removing any Christmas décor pieces that are attached to your wreath so you can start with a fresh base. Give your undecorated wreath dimension by separating all the needles out until the wreath looks full and fluffed. This is commonly known as zjooshing! It also helps when it comes to start adding to your wreath base as you have pieces to attach to.


2. Add pops of colour
Then next step is to add your Deco Mesh. We have used 3 rolls of 12cm Deco Mesh in 3 different colours, however, you could choose to use a 50cm roll of Deco Mesh and have a single base colour.
Starting on the inside of the wreath, twist the ends of the 3 rolls of Deco Mesh into the pine needles of the wreath.
Stretch the rolls of Deco Mesh out to about 30cm, then bring it back to about 15cm and insert it into the wreath to form a loop. Hold it in place by twisting the needle ties around the deco mesh. Congrats, you’ve made your first poof!


Work your way around the wreath repeating this process.


Depending on the size of your wreath, you should be able to get around your wreath about 1.5 to 2 times with the full roll lengths of Deco Mesh. Don’t be worried if you can’t get all the way around your wreath 2 times, as we will be adding lots of other decorations, so you won’t notice this when it is complete. Remember to secure your Deco Mesh around the pine needles once you have finished making your poofs.
3. Attach adorable Easter bunny
Using floral wire, find 2-3 points on the Bunny that you can wrap wire around to be able to secure him or her onto the wreath. I used the Standing Bright Blue Bunny, but you can use one you already have at home, or purchase one to suit your theme from the range of Easter Plush products on our website.


I secured him discreetly by tying wire around his middle (over the back straps of the bunny’s overalls) and the upper part of each leg (under the shorts). The position of the bunny will depend on the size you choose. In this case, he’s positioned on one side. Our tip would be to make sure your bunny is an adequate size to fit proportionate to your Easter wreath.
4. Easter greeting
We are excited to be adding our own ready-to-mount wreath signs to our range, starting with this cute pink Happy Easter design! To add the Easter wreath sign to your wreath, simply feed the pipe cleaner on the back of the sign through your wreath and secure to the base of your wreath.


We have positioned it to be parallel to the Feature Bunny, however you can add it anywhere you like.
5. Freshen up your wreath
Now that you have the 2 main feature pieces in place you can start adding your greenery. We used the Fresh Green Eucalyptus Spray, but you can use any faux (or real) greenery you like or have on hand.
Create separate picks by clipping all the stems off your green bush with wire cutters. Add the greenery around the wreath as evenly as possible. We have affixed the greenery by twisting the needles of the wreath around each pick of greenery, so that it can be pulled apart easily later, but you can hot glue them in, if you prefer.
6. Make it pretty
It’s time to add some (more) pretty bits! We have chosen white and lime green flowers to fill in around our wreath. You can choose any flowers that have the fresh and pretty feeling that we relate to Easter.


Using the same technique we used when adding the greenery, clip the flowers heads off the stem to create smaller picks to work with and secure each one by twisting around the pine needles on the wreath. For a lush effect, be sure to space them out evenly.
7. Bow-tiful Easter wreath
Make a bow using wired ribbons, or simply purchase one of our pre-made bows. A great option for this Easter wreath is our Wreath Sign and Bow Pack.
Add your bow just underneath your wreath sign and secure it using a pipe cleaner or floral wire.


8. Make a statement
Compliment your wreath and décor with some feature flowers to add that final pop of colour. This final step is probably the easiest of them all! We used the same cutting technique as step 5 to separate them, then nestled one under the bow and one at the top to balance it. You can add 1 or 2 more if you like, but be mindful that adding too many may detract from the rest of the pretty features you’ve just added.

You made it! Now it’s time to enjoy your handiwork and display it with pride for everyone to enjoy, including your guests and visitors.
You can opt to show your wreath off inside – on your mantle, entryway or even in your living room. Or hanging your DIY Easter wreath outside is fine too, but be mindful of the feature bunny that you choose if your front door is not covered and open to the weather.
Once you’ve crafted your Easter wreath, we know you’ll be searching for more DIY Easter décor projects! Hop on over to our blog, where you can craft, decorate, bake and gift until your heart’s content. Check out Gifts & Keepsakes if you’re searching for a range of ready-made Easter gifts to suit everybunny, or Easter décor supplies to compliment your DIY Easter craft projects.